By combining Playwright Check Suites with Checkly Groups, you can create a robust monitoring system that scales with your development team.
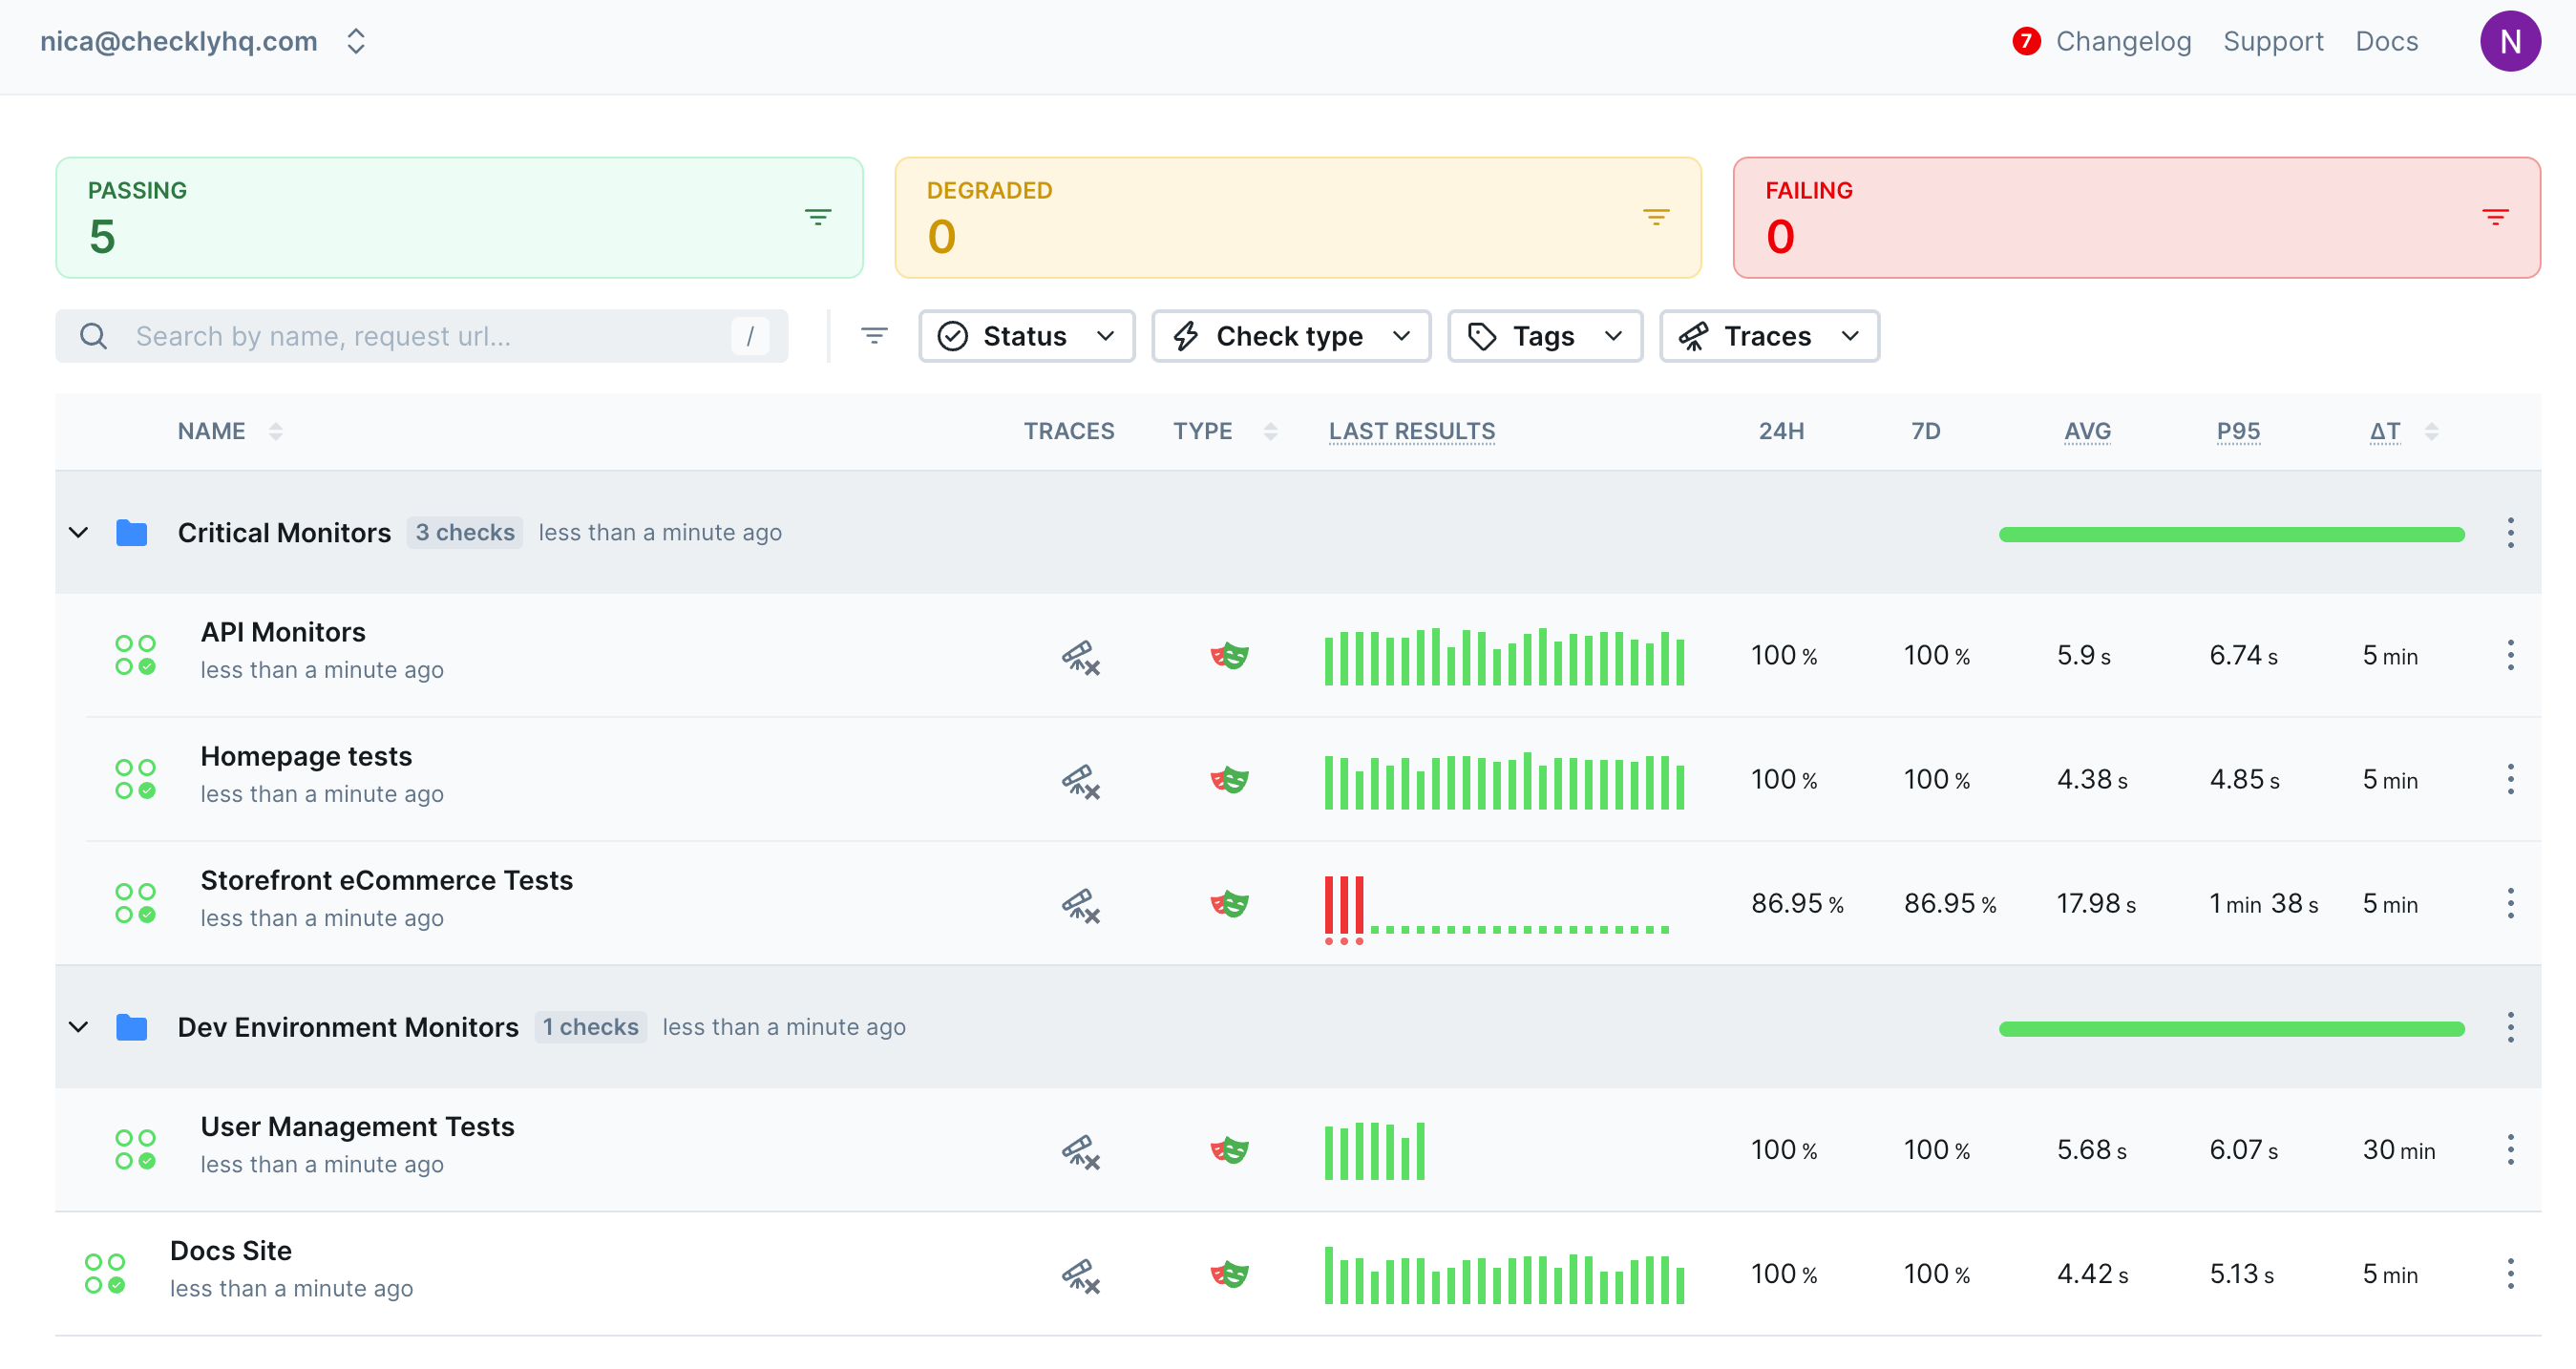
For mature operations teams, organizing your monitoring is as important as its initial design and configuration. Without clear grouping and consistent configuration management, your team will quickly suffer from alert fatigue and confusion during incidents. This guide will show you how to use Checkly’s newest check suite functionality along with groups to manage all your checks and get focused, actionable alerts. Let’s take a look at our goal for this guide:

After following this guide, your Checkly web UI should contain:
- Individual tests collected into Playwright Check Suites to represent functional portions of your site or service
- Groups to let you configure multiple checks simultaneously, controlling your alerting so that everyone gets the notifications they need
- A clear and readable web interface that shows you your services’ status at a glance
Understanding Check Groups vs. Playwright Check Suites
Before diving into implementation, it’s important to understand the distinction between Checkly’s two organizational features:
Playwright Check Suites
Playwright Check Suites are test execution units that group multiple Playwright tests together to run as a single monitor. They focus on what you’re testing:
- Purpose: Bundle related tests that validate a specific feature or user journey
- Scope: Technical grouping based on test dependencies and shared context
- Example: All tests for your checkout flow (search product → add to cart → complete purchase)
- Result: Single pass/fail status for the entire suite
- When to use: When tests are interdependent or represent a cohesive user workflow
Check Groups
Check Groups are management containers that organize multiple checks (including Check Suites) for shared configuration and alerting. They focus on how you manage your monitoring:
- Purpose: Organize checks by team, priority, or operational requirements
- Scope: Operational grouping based on alert routing and configuration needs
- Example: “Critical Production Monitors” containing checkout, authentication, and payment suites
- Result: Shared alerting rules, locations, and notification channels for all contained checks
- When to use: When checks need the same alert escalation, notification recipients, or monitoring frequency
The Relationship
Think of it this way:
- Check Suites = “These tests belong together functionally”
- Check Groups = “These monitors should be managed together operationally”
A single Check Group can contain multiple Check Suites, and each Check Suite inherits the group’s configuration (alerting, scheduling, locations, etc.).
Creating Playwright Check Suites
Checkly’s Playwright Check Suites are a new feature that lets you use your existing Playwright tests as live, scheduled monitoring checks. No rewrites required. Your team can define what to monitor using code, selecting the right tags and projects, and run your checks globally, using the Checkly CLI.
Checkly’s support for Playwright native projects offers a number of advantages for experienced Playwright teams:
- Bring in custom dependencies to run on Checkly’s globally distributed monitoring infrastructure.
- Quickly go from a Playwright project running locally, to scheduled monitoring, with no need to rewrite your project.
- Group tests as needed into Check Suites, showing the status of a whole feature at once.
It’s this last feature that is critical for this guide.
Assigning Playwright Tests to a Check Suite
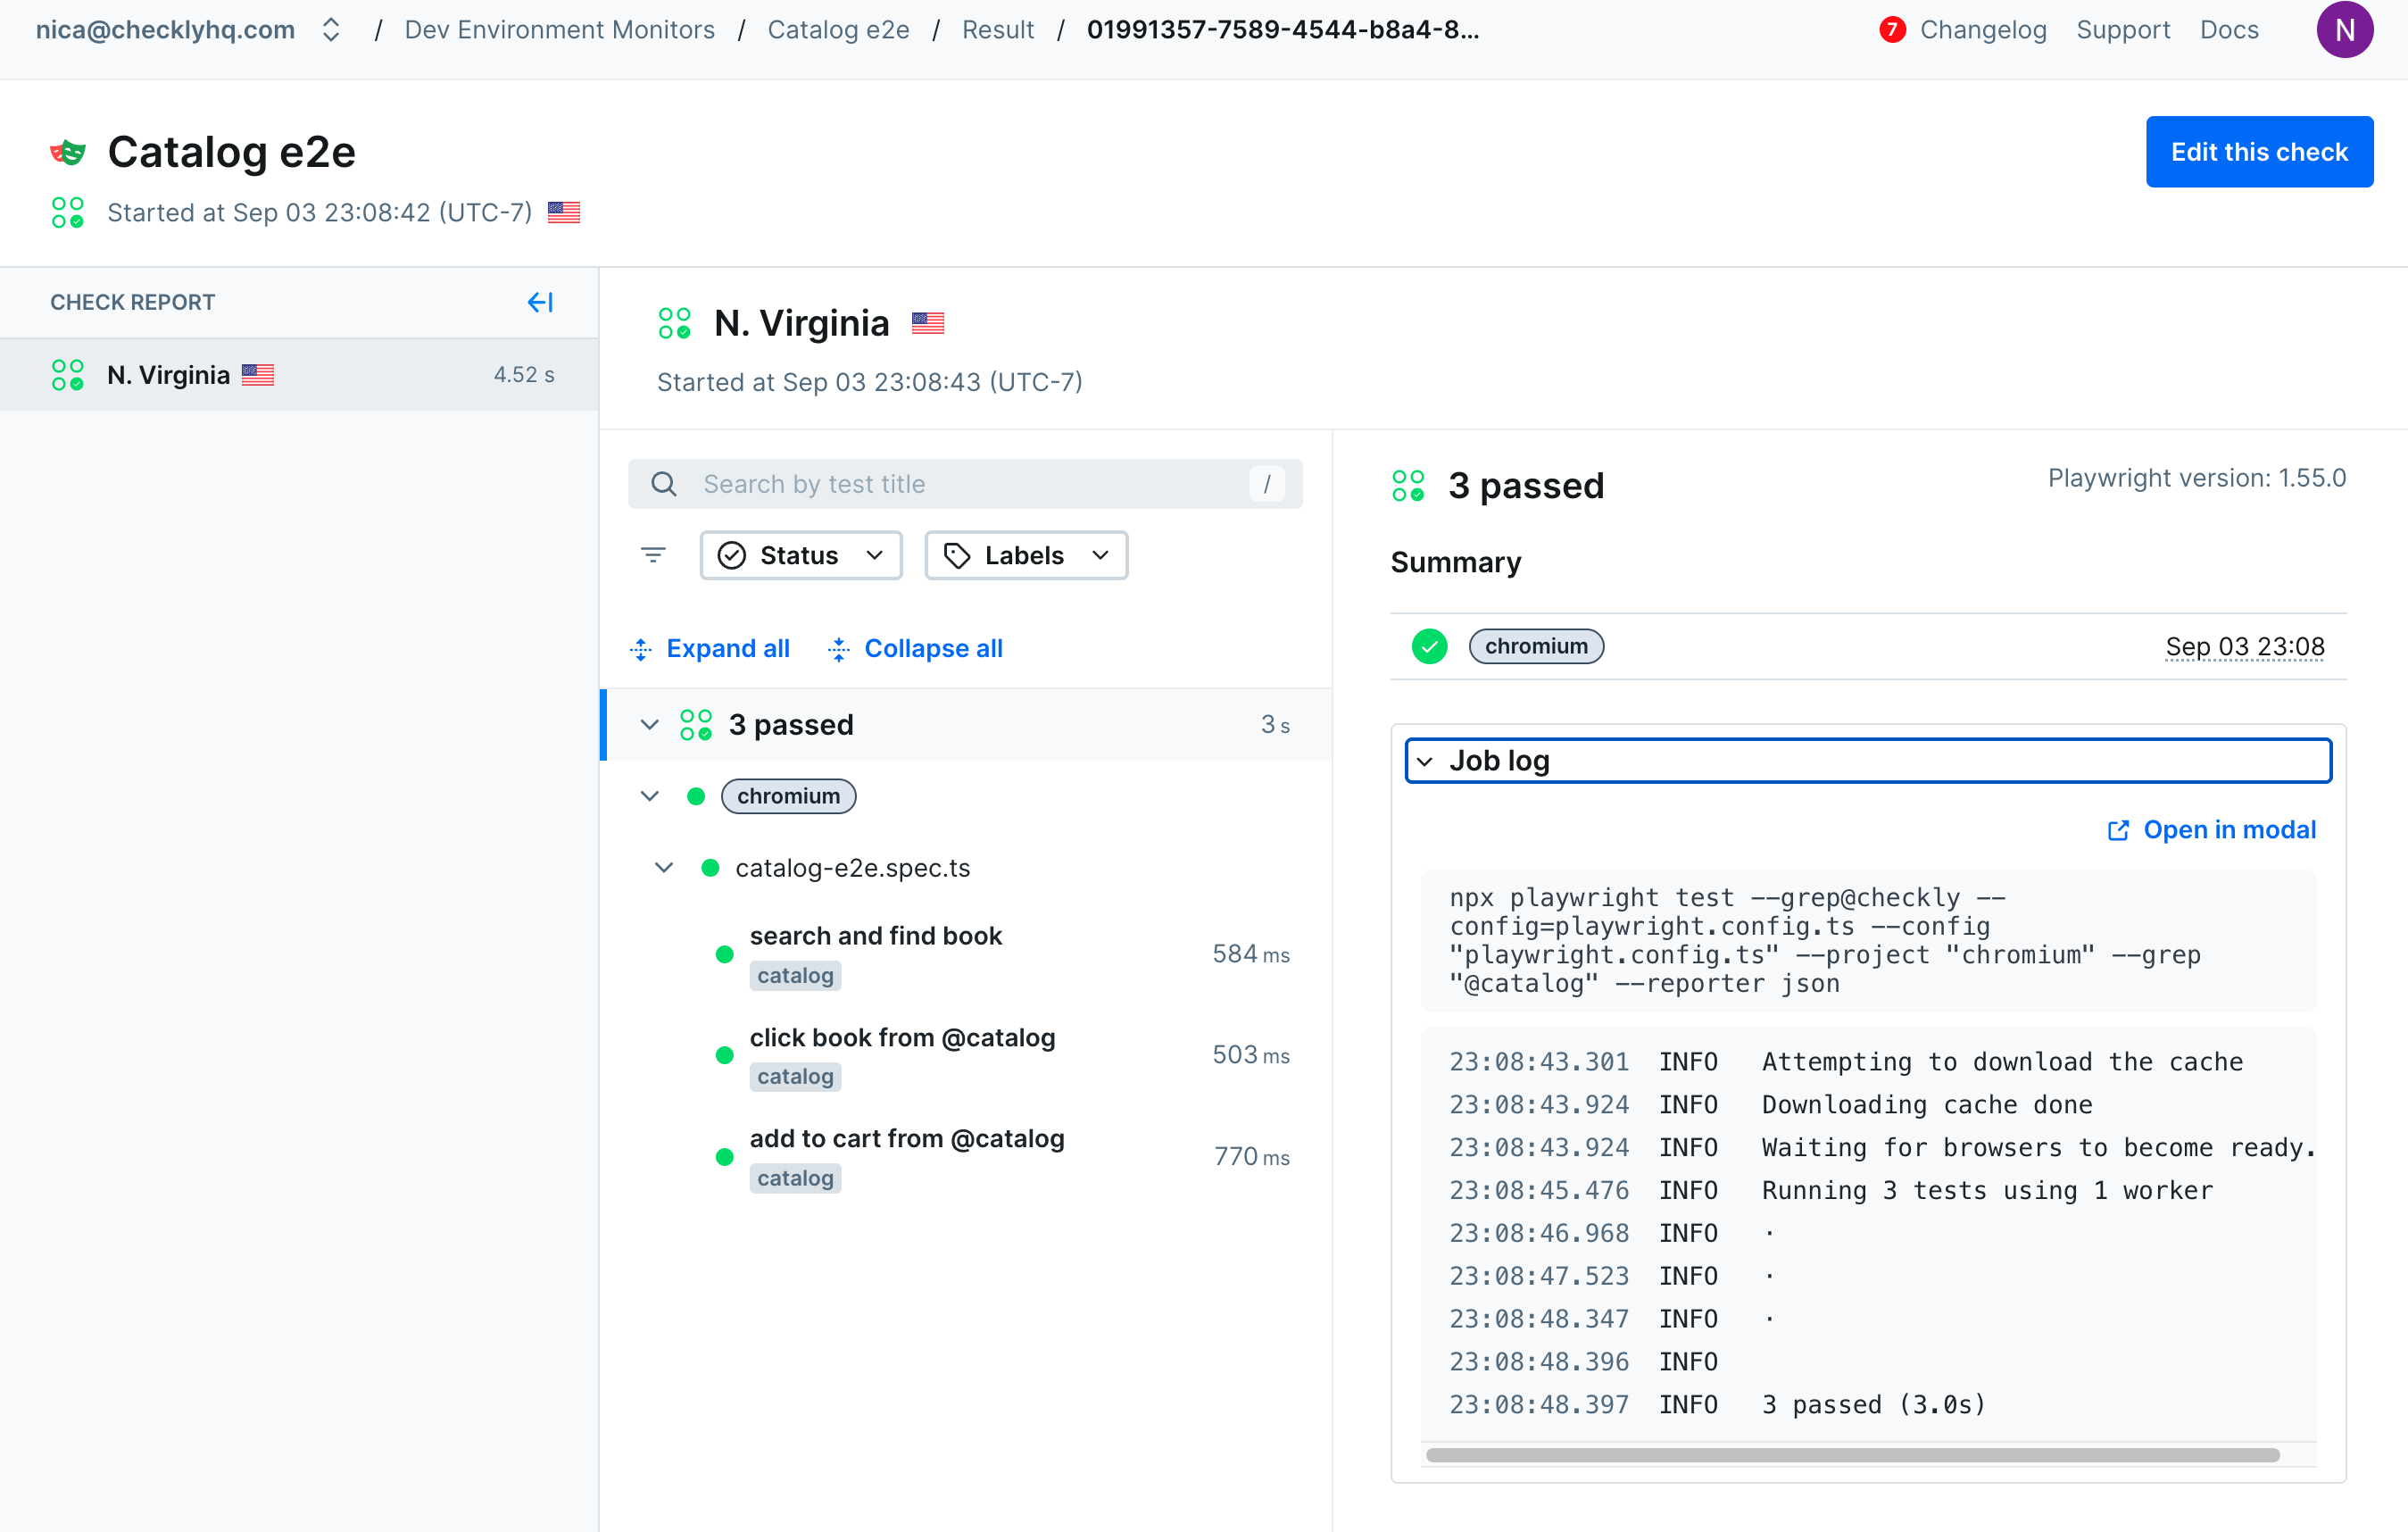
Check suites group multiple small tests into a single result for display on your dashboard. Once we’ve imported a test file to Checkly, we’ll run these tests as a check suite regularly, and get a report back. Here’s an example of the results from a run of a check suite:

Since this monitor will generate alerts, it makes sense to collect these tests into one Check Suite, and get an alert when any one of them fails.
It makes the most sense to group multiple playwright tests into a Playwright Check Suite when you want to run the tests together, and a failure of any included test would mean that the feature wasn’t working.
Let’s take a look at the Playwright tests that we want to turn into the monitor above. Here’s the test file we’ve previously run locally as an end-to-end test:
import { test, expect } from '@playwright/test';

let totalCost: number = 0;
test.describe.configure({ mode: 'serial' }); //these interdependent tests need to run in sequence

test('search and find book', {
  tag: '@catalog', //we need to tag our tests to group them into suites
}, async ({ page }) => {
  await page.goto('http://danube-web.shop/');
  await page.getByRole('textbox').click();
  await page.getByRole('textbox').fill('scott');
  await page.getByRole('button', { name: 'Search' }).click();
  await expect(page.locator('#app-content')).toContainText('$9.95');
  const bookCost: String = await page.locator('#app-content').textContent() || "0"
  totalCost += parseFloat(bookCost.match(/\$(\d+\.\d+)/)?.[1] || "0")
});

//alternatively you can add @tag in the test name
test('click book from @catalog', async ({ page }) => {
  await page.goto('http://danube-web.shop/');
  await page.getByText('Celsius').click();
  await expect(page.getByText('Price: $')).toBeVisible();
  await expect(page.locator('#app-content')).toContainText('$9.95');
  const bookCost: String = await page.locator('#app-content').textContent() || "0"
  totalCost += parseFloat(bookCost.match(/\$(\d+\.\d+)/)?.[1] || "0")
});

test('add to cart from @catalog', async ({ page }) => {
  await page.goto('http://danube-web.shop/');
  await page.getByText('The Grand Grotsby').click();
  await page.getByRole('button', { name: 'Add to cart' }).click();
  await page.getByText('Celsius').click();
  await page.getByRole('button', { name: 'Add to cart' }).click();
  const priceString = totalCost.toString();
  //we've added the same two books to our cart, now check the total price is correct
  await expect(page.locator('#total-price')).toContainText(priceString);
});
This file runs three tests in sequence: looking up the price of two books, then adding both to a cart and expecting the cart total to equal the sum of the book prices. The success of the third test relies on the first two tests.
These tests work great when run from our local playwright environment, but now we are going to run them as an ongoing, scheduled monitor of our catalog service. Due to these tests’ interdependence, it doesn’t make much sense to try and run them separately. Further, the tests in this file cover a single function, our eCommerce shop’s book catalog, so it makes sense to add them as a single check suite.
After completing the setup steps for Checkly and installing the Checkly CLI, all we’ll need to create this first Check Suite is a configuration file:
import { defineConfig } from 'checkly'
import { Frequency } from 'checkly/constructs'

export default defineConfig({
    /* A human friendly name for your project */
    projectName: 'Playwright Group Test',
    logicalId: 'playwrightGroupTest',
    checks: {
        playwrightConfigPath: './playwright.config.ts',
        playwrightChecks: [
            {
                name: 'Catalog e2e',
                logicalId: 'catalog-test-suite',
                pwProjects: ['chromium'],
                pwTags: '@catalog', //all tests with this tag will be included
                installCommand: 'npm install --dev',
                frequency: Frequency.EVERY_1M,
                testCommand: 'npx playwright test --grep@checkly --config=playwright.config.ts',
                activated: true, //run these tests
                muted: false, //send alerts on failure
            }
        ]
    },
})
With this new config file saved in our project we can run npx checkly test to see our tests run through the Checkly global infrastructure:
npx checkly test

Parsing your project... ✅
Validating project resources... ✅
Bundling project resources... ✅

playwright.config.ts

  ✔ Catalog e2e (8s)

1 passed, 1 total

Tip > Use `--record` to get test results in Checkly with full traces, videos and logs: `npx checkly test --record`
Once tests are passing, you can deploy this first Check Suite to Checkly with npx checkly deploy.
Note: by default, a playwright test only captures a trace if it’s running a retry, indicating something has failed at least once. If you want to see traces for your Check Suites even if they’ve run successfully, edit your playwright.config.ts file. The default value for traces is trace: 'on-first-retry' , edit this to be trace: 'on' .
When to Separate Tests Into Multiple Check Suites
In the previous example it made sense to group our three interdependent and closely related tests into a single check suite. Let’s look at a scenario where it makes sense to separate our tests into two check suites.
In this test file, our two tests are looking at quite different areas of our service.
import { test, expect } from '@playwright/test';

test('can open support chat', async ({ page }) => {
  await page.goto('https://danube-web.shop/');
  await page.getByText('support').click();
  await expect(page).toHaveTitle(/GetHelp/);
});

test('can check out', async ({ page }) => {
  await page.goto('https://danube-web.shop/cart');
  await page.getByText('Checkout').click();
  // Multiple Steps of entering checkout details
  await page.getByText('Place My Order').click();
});
Here our test is looking at two totally separate parts of the site, and we don’t want to receive alerts saying that the checkout process is failing when the problem is related to our support service.

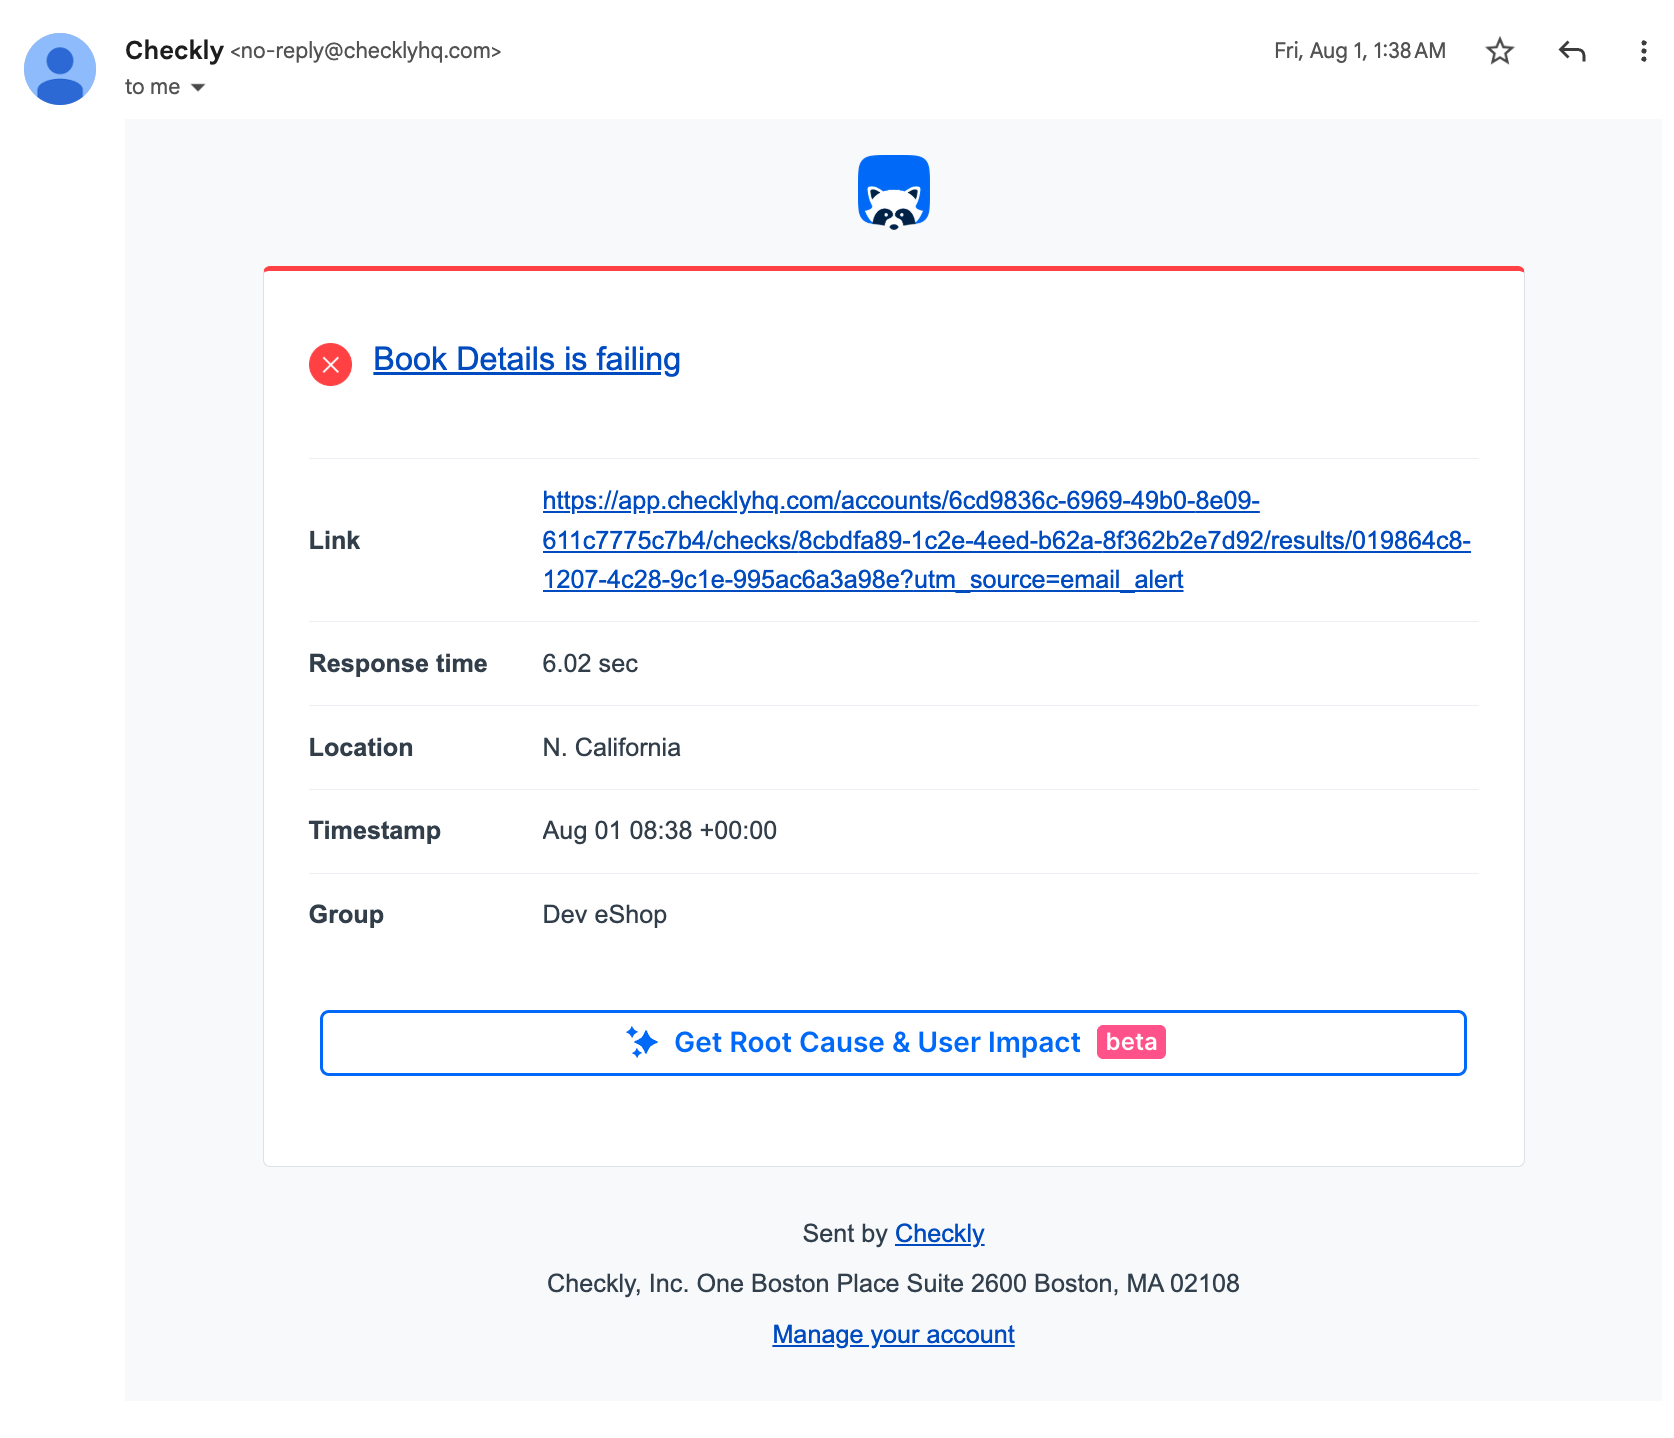
Checkly delivers alerts when one of your monitors fails, and we don’t want to add confusion by mixing up the features being monitored!
The process to separate these checks is quite easy, we want to add tags as appropriate to the tests:
import { test, expect } from '@playwright/test';

test('can open support chat', {tag: '@docsite'}, async ({ page }) => {
  await page.goto('https://danube-web.shop/');
  await page.getByText('support').click();
  await expect(page).toHaveTitle(/GetHelp/);
});

test('can check out',  {tag: '@estore'}, async ({ page }) => {
  await page.goto('https://danube-web.shop/cart');
  await page.getByText('Checkout').click();
  // Multiple Steps of entering checkout details
  await page.getByText('Place My Order').click();
});
To create these Check Suites, just add these tags to our Checkly configuration
import { defineConfig } from 'checkly'
import { Frequency } from 'checkly/constructs'

export default defineConfig({
    /* A human friendly name for your project */
    projectName: 'Playwright Group Test',
    logicalId: 'playwrightGroupTest',
    checks: {
        playwrightConfigPath: './playwright.config.ts',
        playwrightChecks: [
            {
                name: 'Catalog e2e',
                logicalId: 'catalog-test-suite',
                pwProjects: ['chromium'],
                pwTags: '@catalog', //all tests with this tag will be included

            },
            {
                name: 'Docs Site',
                logicalId: 'support-test-suite',
                pwProjects: ['chromium'],
                pwTags: '@docsite', //all tests with this tag will be included

            },
            {
                name: 'Storefront eCommerce Tests',
                logicalId: 'estore-test-suite',
                pwProjects: ['chromium'],
                pwTags: '@estore', //all tests with this tag will be included

            }
        ]
    },
})
The configuration presented here is minimal, we’ll add some more detail in the next section, but for a full explanation, read the reference pages on Playwright Check Suites.
We may want to separate out these tests into two separate tests files. If you are sharing code between these two tests, there should always be a way to separate the shared code to an import that both test files can use. For example a standard login function can be brought into each new test file with:
import { loginFunction } from '../utils/login.ts'
However, it’s not necessary for the purposes of Playwright Check Suites to separate tests into multiple files. In short: just because two tests are in the same file does not mean they have to be run in the same Check Suite.
While Check Suites are perfect for running multiple tests on a single feature, we’d also like to group up our checks to manage them together. For that, we have Checkly Groups.
Check Groups
In our ideal Checkly Web UI, our check suites are organized into logical groups:

It generally makes sense to organize groups by alert priority and working group. For example, the operations team and dev teams will probably use separate groups, and performance measurement shouldn’t be grouped up with critical user paths. We can create these groups via a Checkly construct:
//{title="groups.check.ts"}
import { CheckGroupV2, Frequency, AlertEscalationBuilder } from 'checkly/constructs'
// import alert channel configuration from a local file
import { smsChannel, emailChannel } from './alert-channels'

export const criticalGroup = new CheckGroupV2('check-group-critical', {
  name: 'Critical Monitors',
  activated: true,
  muted: false,
  locations: ['us-east-1', 'us-west-1', 'eu-central-1', ],
  // By setting an alertEscalationPolicy, these settings will override those on individual checks
  alertEscalationPolicy: AlertEscalationBuilder.runBasedEscalation(
    4, // Alert after 4 failures
    { amount: 2, interval: 5 }, // Send 2 reminders, 5 minutes apart
    { enabled: true, percentage: 50 } // Alert if 50% of parallel runs fail
  ),
  alertChannels: [emailChannel, smsChannel]
})

export const devGroup = new CheckGroupV2('check-group-dev', {
  name: 'Dev Environment Monitors',
  activated: true,
  muted: false,
  locations: ['us-east-1', 'eu-central-1', ],
  alertEscalationPolicy: AlertEscalationBuilder.runBasedEscalation(
    1, // Alert after 1 failure, this is way too sensitive for every day but makes sense while testing changes on Dev
    { amount: 2, interval: 5 }, // Send 2 reminders, 5 minutes apart
    { enabled: true, percentage: 50 } // Alert if 50% of parallel runs fail
  ),
  alertChannels: [emailChannel]
})
Our groups are based on how we want to be notified, and shared configuration for all the included checks. For our critical monitors, we want rapid updates in the event of failure, via both email and SMS. Critical monitors also perform a few retries before generating an alert. For our Dev environment, email is fine as an alert channel, but we want to be notified the minute a failure is detected.
Next we can update our checkly.config.ts to add our Check Suites to groups. Update the items in playwrightChecks with a group name:
            {
                name: 'Catalog e2e',
                logicalId: 'catalog-test-suite',
                pwProjects: ['chromium'],
                pwTags: '@catalog',
                groupName: 'Critical Monitors',
                // additional config removed for brevity
            }
Check Suites will be added to groups based on the name value in the group configuration. You can also add groups to groups you’ve previously created by matching the name.
When we’re done, you can deploy your group, and update your checks to those groups, with the deploy command:
  npx checkly deploy --preview #confirm what will be deployed
  npx checkly deploy -o  # deploy and output a list of what was updated
Conclusion
By combining Playwright Check Suites with Checkly Groups, you’ve created a robust monitoring system that scales with your development team. Check Suites allow you to leverage your existing Playwright tests as live monitors without rewrites, while Groups provide the organizational structure needed to manage alerts effectively and reduce noise during incidents.
This approach delivers several key benefits:
- Developer-friendly monitoring that integrates naturally with existing test workflows
- Clear organization that prevents alert fatigue and confusion during outages
- Focused alerting that ensures the right teams get notified about relevant failures
- Scalable architecture that grows with your application and team structure
As your monitoring needs evolve, you can easily expand this foundation by adding new Check Suites for additional features and creating specialized Groups for different teams or alert priorities.
Further Reading
- Full documentation on creating a [Playwright Suite](https://www.checklyhq.com/docs/playwright-checks/reference/).
- Explore [Group Configurations](https://www.checklyhq.com/docs/groups/#group-level-configuration).